

UE5 — Houdini
Bringing Animated Geo into
Unreal Engine as a Skeletal Mesh
(using an FBX ROP)
Introduction.
Sometimes it is necessary to bring animated or simulated geometry over from Houdini into Unreal as a Skeletal Mesh, rather than an Alembic or VAT. This is especially necessary in cases where you may want to emit Niagara particles from the surface of an animating mesh, i.e. destruction sims where debris is coming out of a collapsing building. This tutorial will show off a few handy tricks that allow you to do this without getting into complex rigging methods in Houdini.
If you want to follow along in Houdini, here is my file:
Tutorial.
First off, you will need animating geo to work with. For the sake of this tutorial, I have created a simple cube fracturing with an RBD simulation. This could really be any animated geo, though.

Feed your animated geo through an assemble node. Check the “Create Packed Primitives” box and add normals (N) to the “Transfer Attributes” box.
Normals are how orientation is going to be calculated down the line, so they are necessary. Any other attribute you want can be included here, for example, I included uv.

By packing the primitives, the assemble will give you a single point representing each piece of the animating geo, with a unique point number.

Normals (N) need to be promoted from a Vertex Attribute to a Point Attribute, in order to be properly read down the line. Use an Attribute Promote SOP for this.

For the steps following this one, it is essential that the points have a consistent Name attribute. To set this, I am using an attribute wrangle to set name based on point number. The VEX for this step is:
@name = "piece"+itoa(@ptnum);
@name is establishing the “name” string attribute. For this I want the attribute to read “piece{X}” with X being the point number of each piece. So I am taking the string “piece” and adding that point number. However, @ptnum is an integer, so we must use the itoa function which casts an integer into a string value.

If something isn’t working it is likely because of an issue with either your name attribute or your normal attribute!
This step may feel a little convoluted so I’m going to explain what we are trying to do and then break it down into it’s parts:
The goal here is to establish a “path” attribute that we can use to package up our geo in an FBX Output ROP, but without distorting or losing our animation. If we simply try to plug what we have into an FBX output, it won’t have any animation, and if we do these steps improperly, our animation will come out improperly. These steps will package our geo into the correct hierarchy, and then apply our animation after that, using a Transform Pieces SOP.
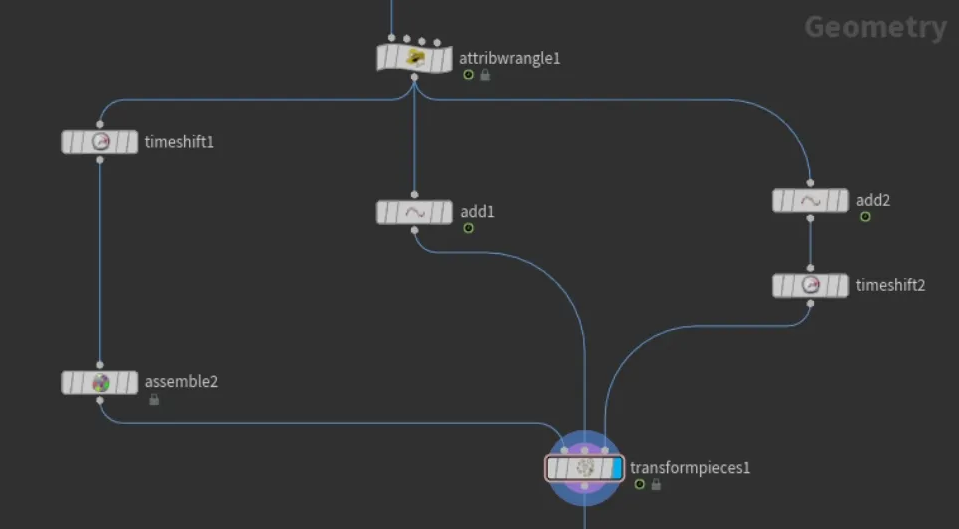
Note that the Transform Pieces SOP has 3 inputs, the first calling for the “Geometry to Transform,” the second the “Template Points,” and the third the “Rest Points.”
The first input is where we will feed in our static geometry with a proper “path” attribute.
To do this we first must use a Time Shift SOP to freeze the animation. Use CTRL+Shift+LMB and click on the “Frame” box to delete the existing channel in that parameter, and then type in the frame you want to freeze (usually the first frame).

Then, feed that into another assemble, this time checking on “Create Packed Primitives” & “Path Attribute,” but unchecking “Create Packed Fragments.” You will need to transfer any custom attributes again here, but you don’t need normals (N) because they are being applied elsewhere for the anim. I’m transferring UVs again here.

Feed this into that first input on a Transform Pieces SOP
For the second input, it is pretty straight forward. We just need to feed in animating points, but without the packed geo.
Run the geo from the attribute wrangle into an Add SOP and check “Delete Geometry But Keep the Points.

Feed this into that first input on a Transform Pieces SOP
For the third input, we need the Rest points, which is essentially just taking the steps from the second input, but freezing them in time to match the geo on the first input.
“Delete Geometry But Keep the Points”

Freeze time using a Time Shift SOP, but make sure the frame number matches the previous Time Shift or you will see artifacts.

Plug this into the third input.
This all works because of the name attribute we established in the prior step.
If you are troubleshooting, check to see if the name attributes on the three
different inputs for the Transform Pieces match, and if not, that is your issue.
The second to last step in Houdini, is just scaling up x100 to match Unreal’s default scene scale, using a Transform SOP.

Finally, we can feed this all into an FBX ROP. There are a few key settings that need to be adjusted here.
Change “Valid Frame Range” from “Render Current Frame” to “Render Frame Range” & make sure that your frame range matches your anim.
Set your “Output File” destination.
See image for proper check box selections.

Press “Save to Disk”
Leaving Houdini and going into Engine, open up the desired project and begin importing the .fbx you just outputted from Houdini. Below are the import settings you want to use:


Hit “Import” and viola! You should have a Skeletal Mesh, an Animation Sequence, and a Skeletal Rig, and if you open the Animation Sequence you should see your animation playing back. You can now do whatever you want with this in Engine.
